Salesforce integration guide
How to connect Sanka and Salesforce
Last updated: July 14, 2026
Overview
By integrating Sanka and Salesforce, you can sync leads, accounts, contacts, opportunities, activities, and custom objects between the two platforms, and use workflows to boost productivity. This guide walks you through connecting Sanka and Salesforce for seamless operations.What the integration supports
Use the Salesforce integration when Salesforce remains the CRM system and Sanka manages the operational work that follows customer, account, or opportunity updates. Depending on your workspace setup, the integration can help with:- Syncing Salesforce leads, accounts, contacts, opportunities, activities, and custom objects with Sanka records
- Importing Salesforce account data into Sanka companies and related customer records
- Mapping Salesforce fields to Sanka properties and associations
- Using Salesforce opportunity data with Sanka document templates, quotes, proposals, or order documents
- Running Sanka actions or workflows after imported or synced records meet your team's conditions
Sample prompt
/sanka Review this Salesforce and Sanka record before making any changes. Confirm the matching account, contact, opportunity or company, field visibility, field mapping, sync direction, owner, required fields, and any action or workflow that should run. Do not create, update, send, or convert records until I approve the plan.Expected behavior
After the connection succeeds, Salesforce appears on the Sanka integrations page. Records sync or import only when the relevant mapping, permissions, and manual or automated job are configured. When Salesforce data is imported or used in Sanka, the expected success state is:- The Sanka record keeps a clear source back to the Salesforce record
- Required account, contact, opportunity, owner, amount, currency, status, and association fields are filled or reviewed
- Field mapping respects Salesforce field-level security and Sanka property types
- Downstream actions or workflows run only when they are enabled and their conditions match
- Record history and audit logs show what changed, who or what changed it, and when it happened
How to connect
-
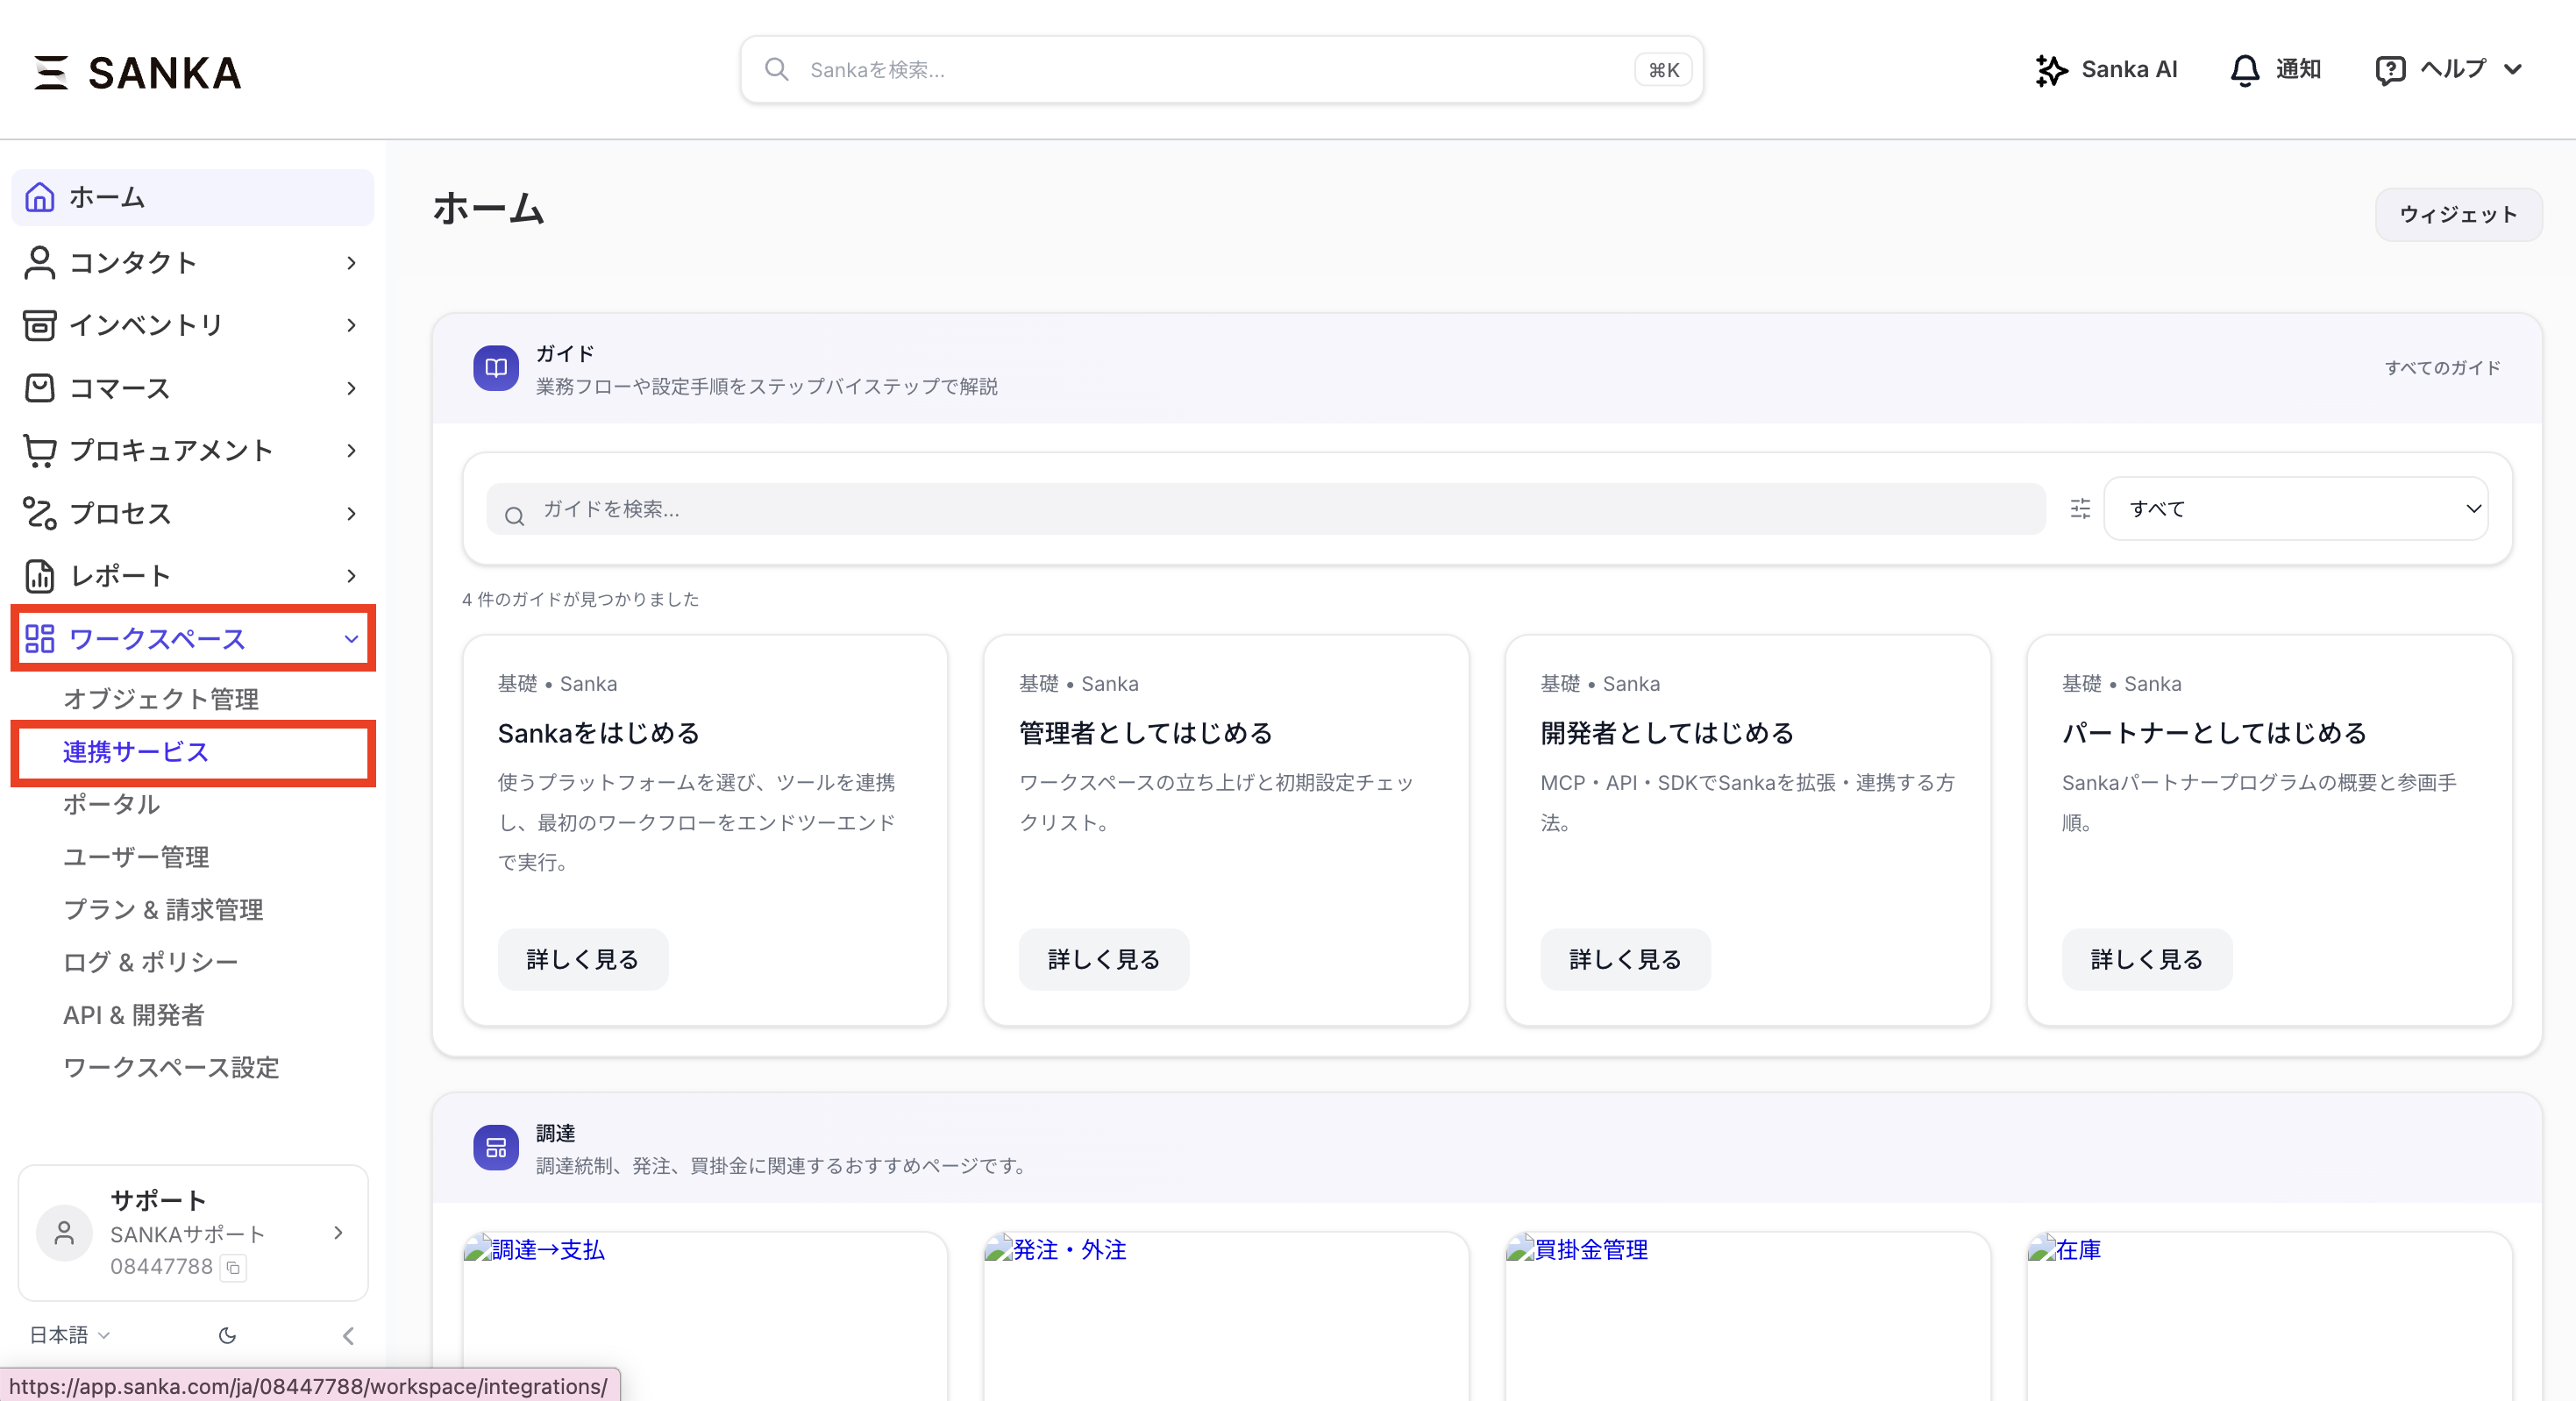
In the left sidebar of the dashboard, click the Workspace tab, then click Integrations.
-
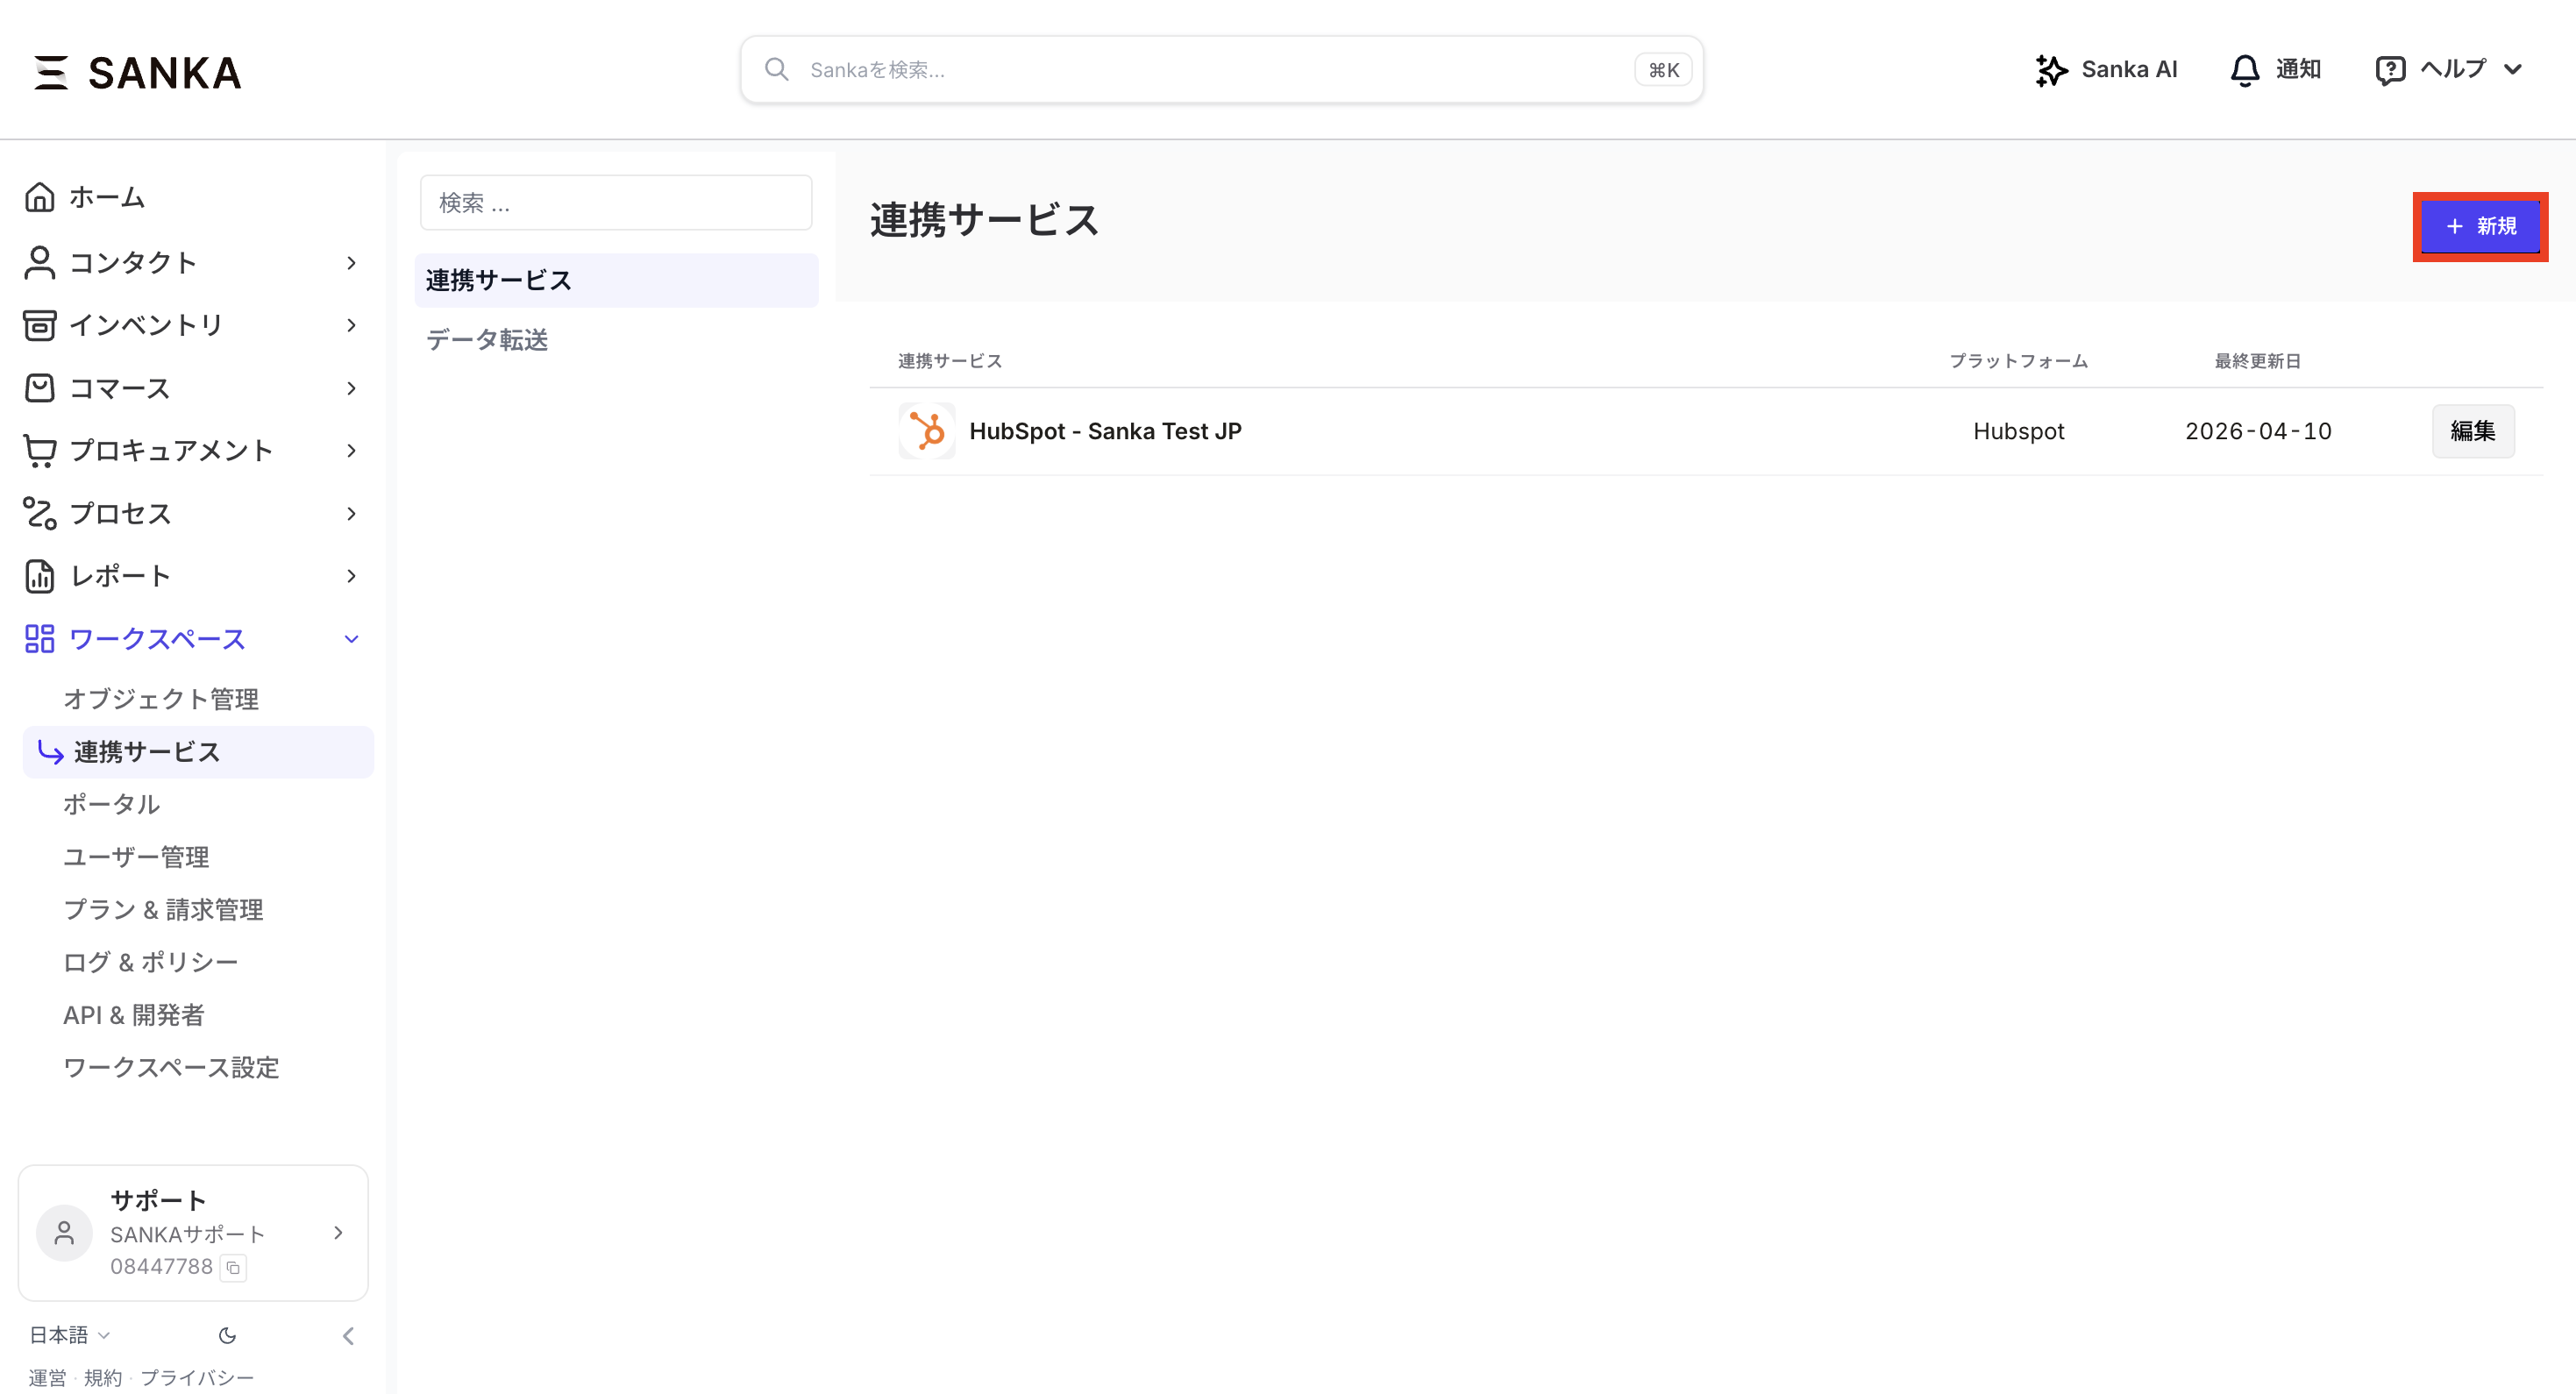
Click the New button on the integrations page.
-
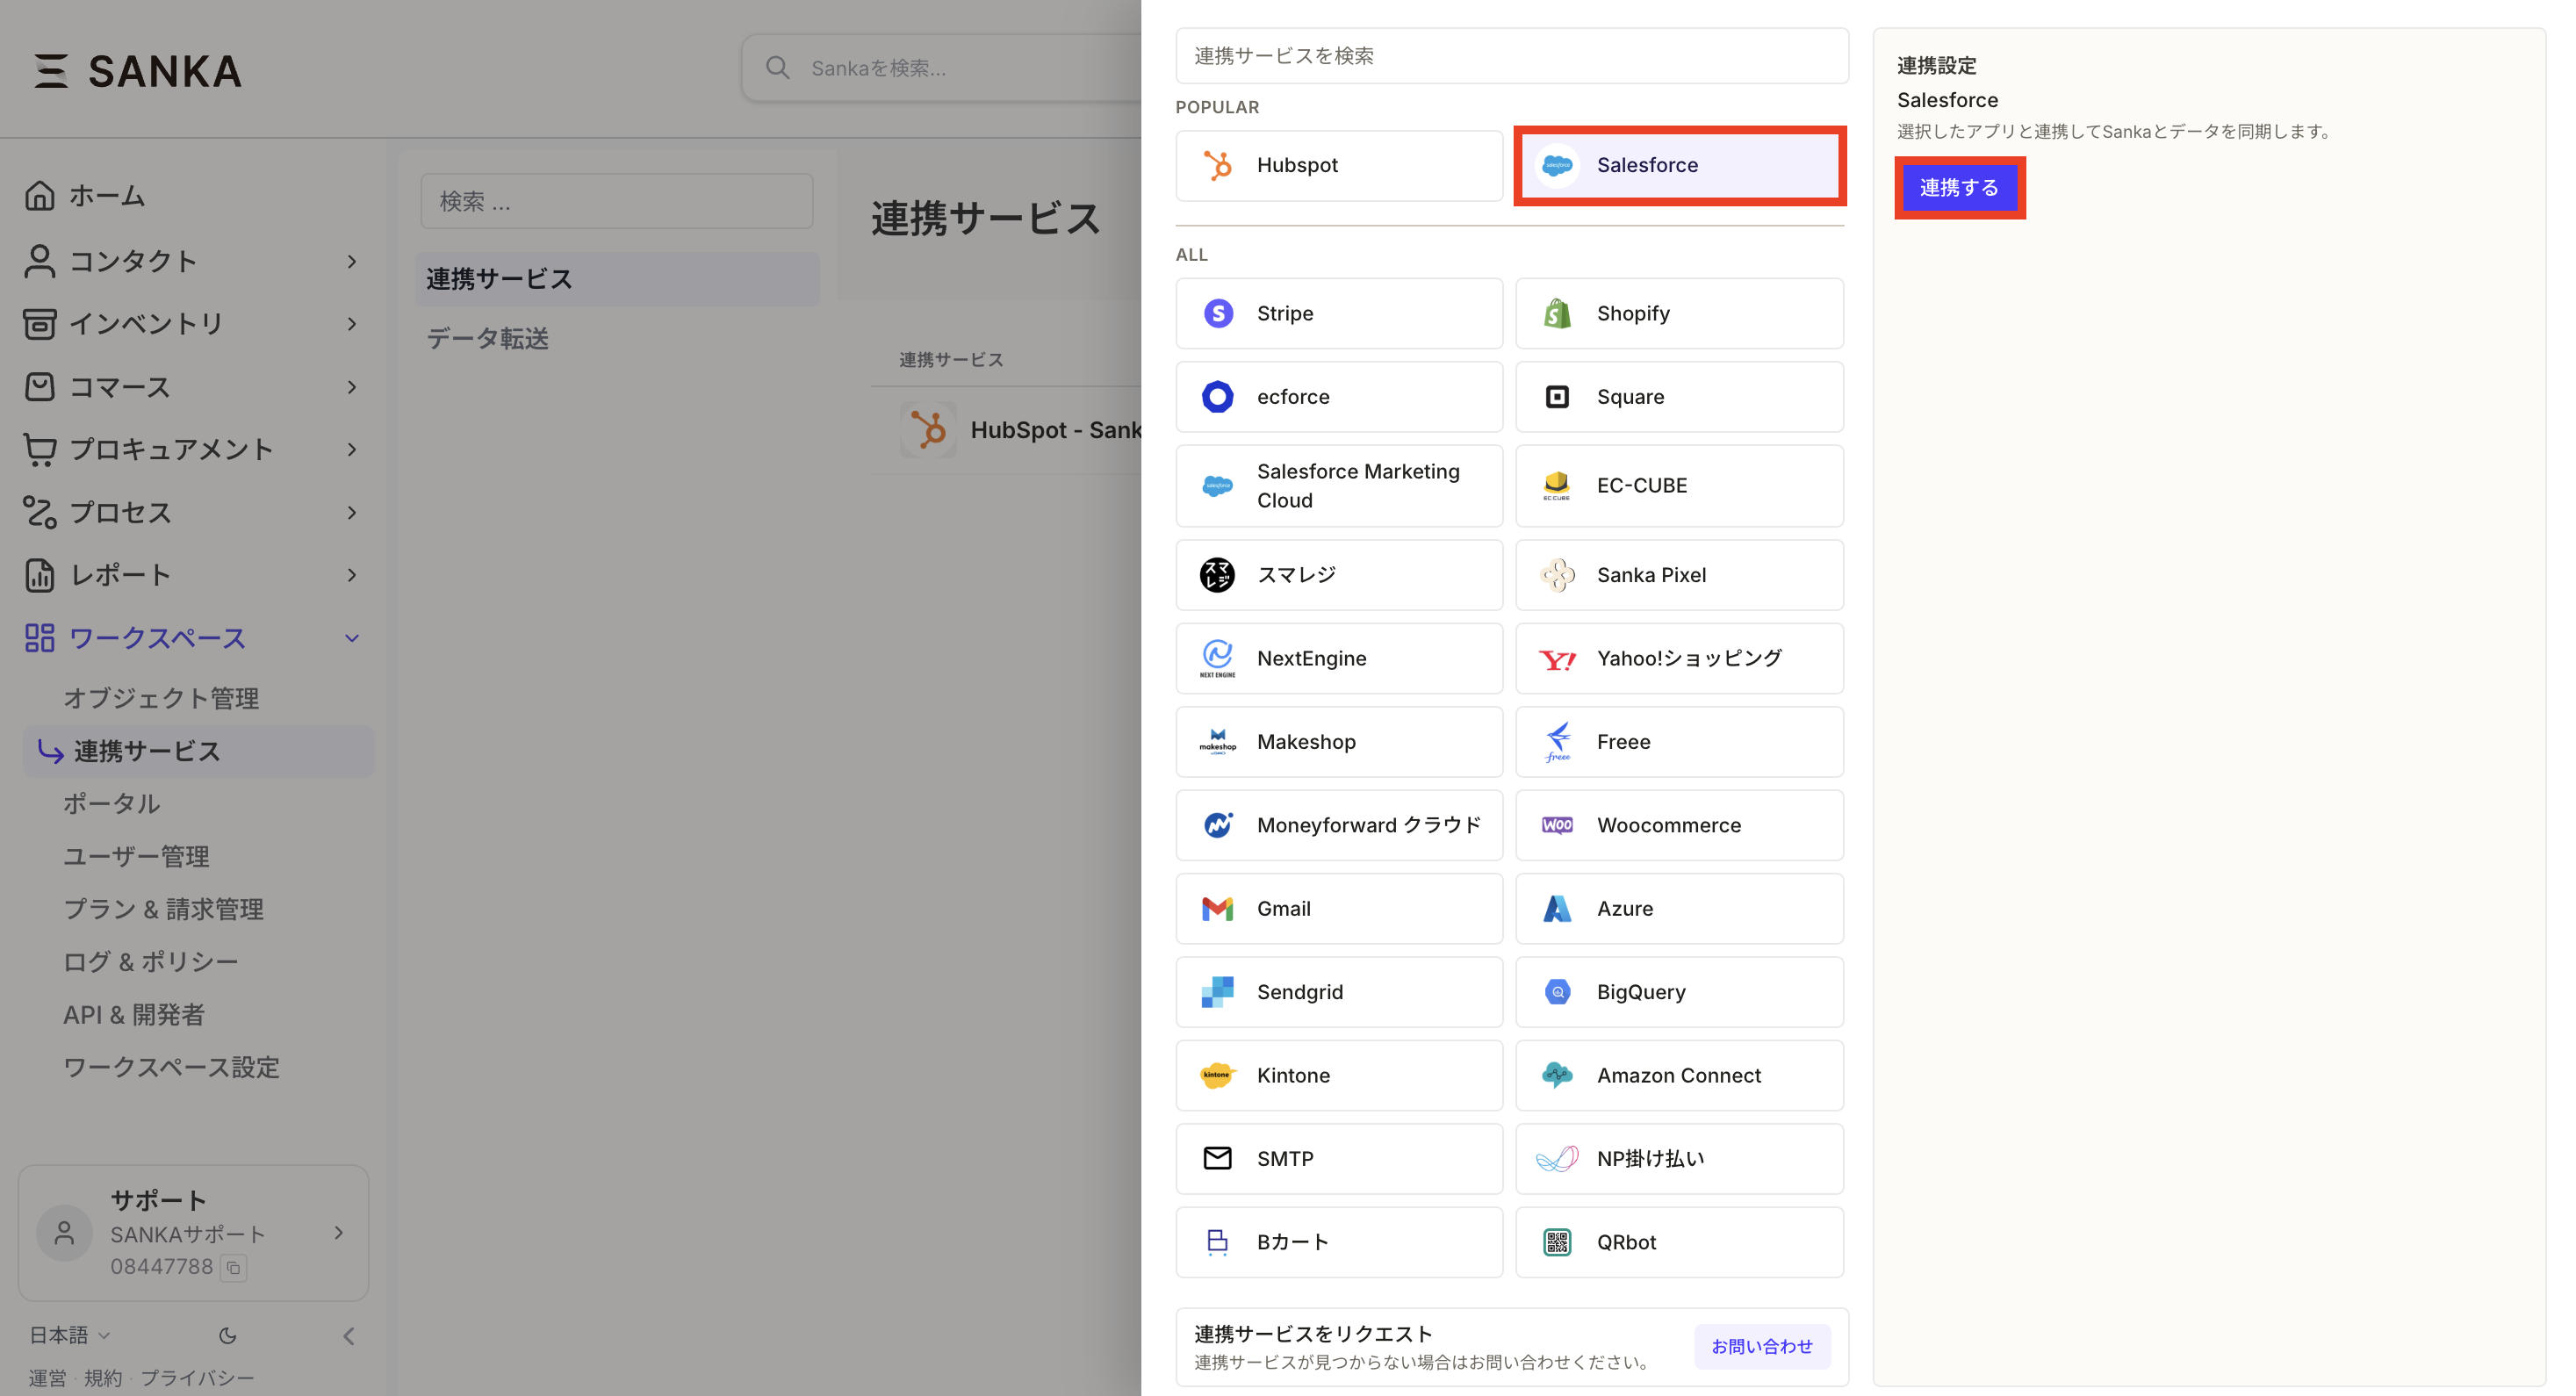
Select Salesforce and click the Connect button.
- The Salesforce authentication page opens. Select the account you want to connect and approve access.

- Once access is granted, you are redirected back to Sanka. After a successful connection, the Salesforce account appears on the integrations page.

Install Sanka in your Salesforce workspace
To show Sanka Templates on Salesforce opportunity pages, install the Salesforce package provided by Sanka in your Salesforce environment. A Salesforce administrator should complete this setup. After installation, add Sanka Templates to the opportunity page as described in the next section.Prerequisites
- The Salesforce installation link provided by Sanka
- A Salesforce administrator account
- A completed Sanka and Salesforce integration
Installation steps
- Open the Salesforce installation link provided by Sanka.
- Sign in to Salesforce as an administrator.
- On the Install Sanka Templates Launcher screen, choose who can use the package.
- Install for Admins Only: Use this when administrators want to test placement and visibility first.
- Install for All Users: Use this when sales users and other target users should use it immediately.
- Install for Specific Profiles: Use this when only specific departments or user groups should use it.
- Click Install.
- Wait for installation to finish. If it takes time, wait for the Salesforce completion email or check the status under installed packages in Salesforce Setup.
- Continue to the next section and add Sanka Templates to the opportunity page.
Use document templates on Salesforce opportunities
After connecting Sanka and Salesforce, sales users can open Sanka Templates from a Salesforce opportunity and create or download quotes, proposals, application forms, or other documents using opportunity data. A Salesforce administrator should place the component on the opportunity page. Sales users can use it from the Salesforce opportunity page after setup.Prerequisites
- The Sanka and Salesforce integration is connected
- Document templates are available in Sanka
- You can edit Salesforce Lightning pages
Setup steps
- In Salesforce, open an opportunity record where Sanka Templates should appear.
- Click the gear icon in the top-right corner and select Edit Page.
- In Lightning App Builder, search for Sanka Templates in the component list.
- Drag Sanka Templates to the place where users should see it. To show it near the top of the opportunity, place it near the opportunity details. To keep the template list visible, place it in a right column or dedicated tab.
- In the settings panel, enter the Sanka workspace ID.
- Sanka Workspace or Channel ID: Usually enter the Sanka workspace ID from the Sanka URL. If one workspace has multiple Salesforce integrations, enter the Salesforce integration service ID provided in Sanka instead. Do not enter a label such as
sankaor another arbitrary value. - Button Label: Enter the label shown in Salesforce, such as
Sanka Templates. - Setting Type: For opportunity documents, enter
order. - Display Mode: Enter
embeddedto show the component inside Salesforce. - Embedded Frame Height: Enter the display height, such as
720px. - Language: Enter
ento show English. If blank, the browser language is used.
- Click Save.
- If Salesforce asks you to activate the page, click Activate.
- Choose how broadly to assign the edited Lightning record page:
- Org default: Show Sanka Templates on all opportunity pages.
- App default: Show it only in a specific Salesforce app, such as Sales.
- App, record type, and profile: Show it only for specific departments, record types, or user groups.
- Click Done and return to the opportunity page.
- Confirm that Sanka Templates appears at the top of the opportunity page or in the location you selected.
Import accounts
① Open the Companies menu in Sanka and click Import. ② Map the Salesforce fields to Sanka properties.
 ③ Note! Before importing into Sanka, make sure the Salesforce field's "Field-Level Security" settings have both "Visible" and "Read-Only" checked as needed. If they are not enabled, the fields will not show up in property or association mapping.

 ④ After mapping, click Import to complete the import.

Troubleshooting
Salesforce is connected but records are missing
Confirm that the expected object is enabled for sync or import, field mapping includes required fields, and the connected Salesforce user can view the object and fields. For one-time imports, review the import status and any error file before rerunning the import.A field does not appear during mapping
Check Salesforce field-level security, object permissions, and whether the field is visible to the connected user. If a field is hidden in Salesforce, Sanka cannot reliably map or sync it.A field did not update
Check the sync direction, mapped property, field type, required-field rules, and whether another Sanka workflow or manual edit changed the value after the sync.Duplicate records were created
Review the matching rule used for account, contact, opportunity, company, or related record creation. Duplicates often happen when a record ID, email, domain, or another matching field is missing or inconsistent.A document, quote, order, or follow-up was not created
Check whether the related action or workflow is enabled, whether the Salesforce record met the required conditions, and whether all required Sanka fields were available. Treat this as an expected configuration issue until mapping, action history, and workflow history show that the step should have run.Permission errors
Text
We can't authenticate you because of an OAuth error. For more information, contact your Salesforce administrator.
OAUTH_APPROVAL_ERROR_GENERIC : An unexpected error occurred during authentication. Please try again.
 If you see an error like the above, check your system administrator's restrictions and make sure the following permissions are enabled:
- Create, edit, and delete connected apps
- View all external client apps, their settings, and edit policies
- Customize application
- Check the user's permissions in Setup
- In Setup, go to Profiles and select the user's profile
- Under System > System Permissions, click Edit and make sure the two permissions above are enabled
- Save your changes and try connecting Sanka and Salesforce again
IP restriction errors
If IP restrictions are in place, add the following IP addresses to the allowlist under System > Network Access and user access restrictions:Text
135.149.17.191, 74.226.178.5, 135.149.42.83
Sanka Templates does not appear in Salesforce
If Sanka Templates does not appear on the Salesforce opportunity page, check that:- The Lightning page is saved and activated
- The edited page is assigned to the target app, record type, profile, or organization
https://app.sanka.comis allowed as a trusted site in Salesforce- The Sanka workspace ID or Salesforce integration service ID is entered correctly
- The value is an actual Sanka ID, not an integration name or arbitrary label
Checkpoints
Use Sanka records, action history, workflow history, and audit logs to confirm the Salesforce flow before replying to a customer or asking AI to make a code change.Review Salesforce integration activity
Logs
Search logsAll actionsAll dates
ID / ActionDateTarget / ItemChangeActor
3Reviewed Salesforce mapping2026/05/10 11:00Salesforce account importChecked account fields, owner, field visibility, and source recordClaude integration
2Imported account to company2026/05/10 11:15Green Salon GroupCreated company from Salesforce account after mapping reviewSanka integration
1Checked document template setup2026/05/10 11:30Salesforce opportunity pageConfirmed Sanka Templates placement and workspace IDSanka user
A safe review should include the Salesforce source record, the Sanka record, field visibility, field mapping, sync direction, and any document, action, workflow, or downstream record that was expected.